

Well exciting news!
Your wish has come true! :^P
The last time I gave myself Salon Nails (which was probably in 2006) the process took sometimes more that 2 hours, it was messy, it was hard work and even with the windows open, the whole house still ended up smelling like a shoe factory!
Turns out the process has gotten way easier since then!
I was strolling through my neighborhood K-mart the other day (on my way to pick up a few shipping envelopes) and stumbled upon this box of BROADWAY NAILS - Real Life Brush-On Nail Kit. Someone shoved them on the shelf of envelopes, which is why I even noticed them.

If you've ever attempted to give yourself Salon Nails at home, or if you never even dared to, you should definitely give these a chance! You will be pleasantly surprised!
The thing I loved best about this set of Broadway Nails is that, if you ever got tired of them, or if you screwed up on a nail, you would not have to soak your hands in a mixture of gasoline + acid + fire to peal them off.
(JK about that mixture...i'm pretty sure it will kill you.)
 To take these off, all you have to do is soak a cotton ball in Nail-polish Remover with Acetone in it, which is any ol regular Nail-polish Remover, then just rub off the fake nail.
The process is fast and easy, actually easier than trying to remove Glitter Nail-Polish.
 Well, now that you are really excited about getting your manicure on, I'll go ahead and start with my tutorial. :)
**The reason I decided to make a tutorial for these Broadway Nails is because the instructions that came with the kit are tiny, not very clear and don't really have pictures. Plus I though this could also serve as, in a way, a review for the BROADWAY NAILS - Real Life Brush-On Nail Kit
Here are the contents of the box, plus a nail-polish I picked out to finish the manicure with. (click on pictures to enlarge)
The box actually comes with 2 sets of nails. One set (of 20) french manicure and another set (of 20) plain manicure and that pink thing on the bottom of the picture is a nail filer.
So let's get started!
1) Wash your hands with soap to get rid of any lotion or oils off of your nails, then if you are hard core like me, you can file the tops of your nails a little for a better, more sturdy attachment. Normally that is not recommended because it's not so good for your nails. But nails grow and the body heals...

2) Select the perfect size tip for each nail.

Got your set of 10 picked out? Great!
NOTE: Start working on your dominant hand.
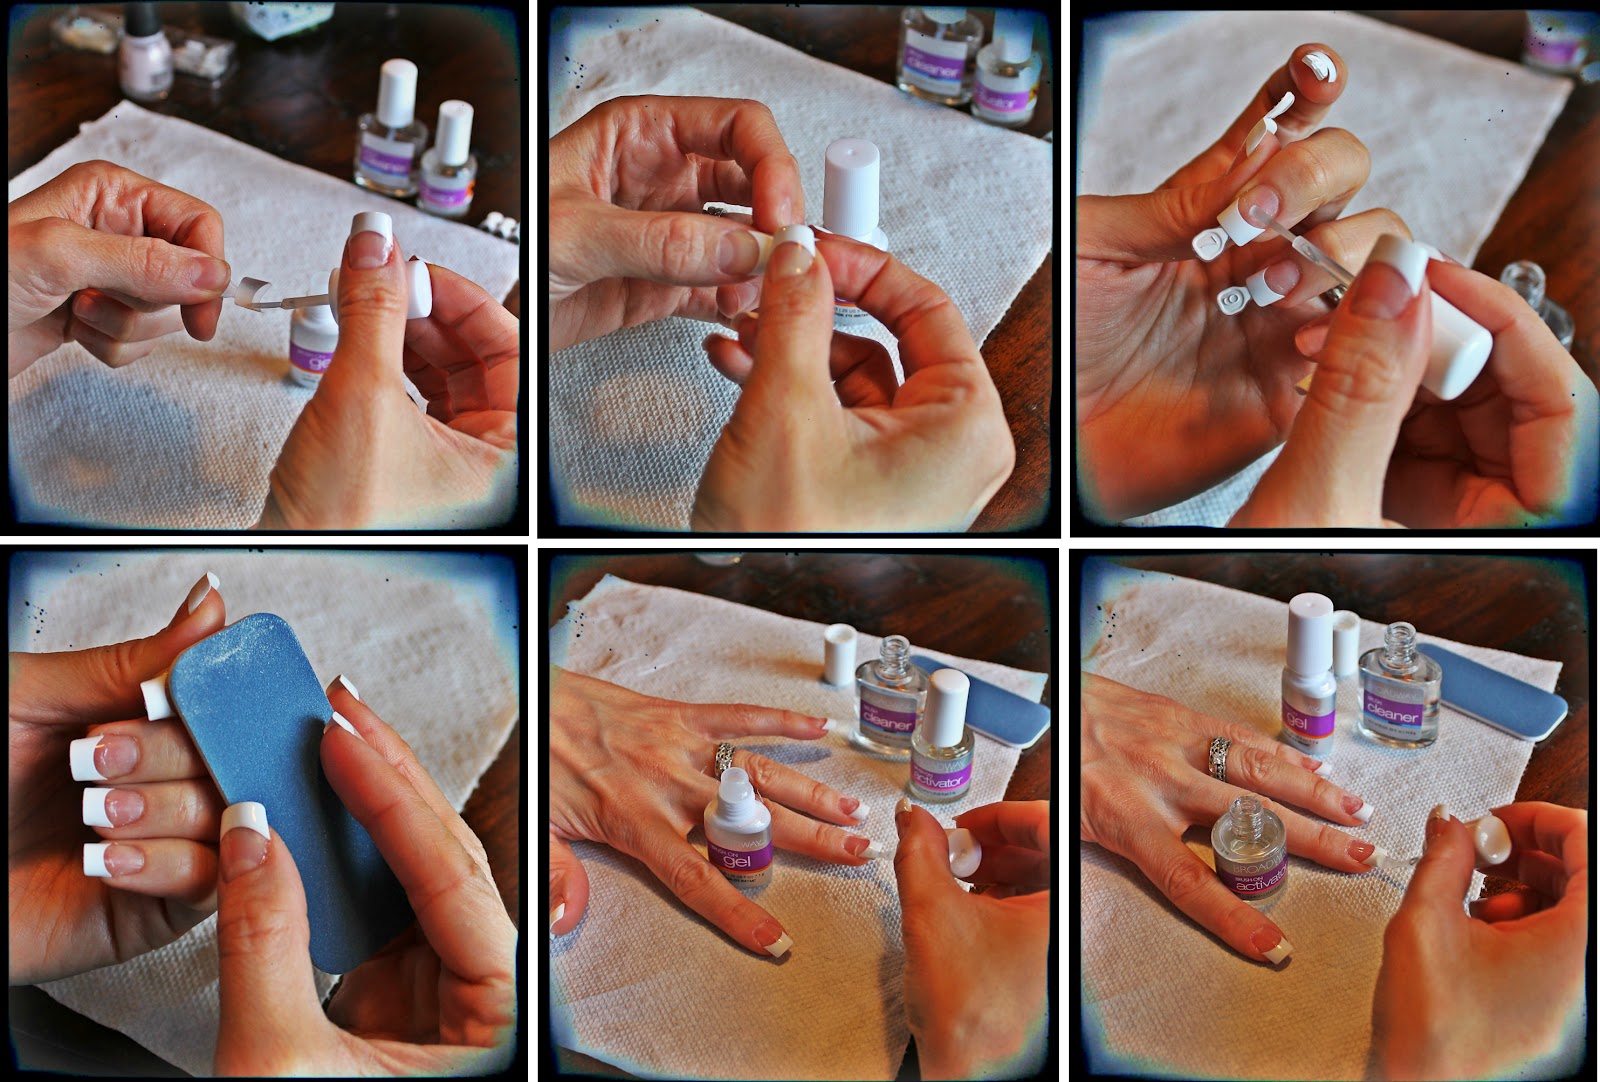
3) Get the Brush On Gel (this is your glue) and sweep some on the inside of the fake nail tip.

4) Stick that tip on, press and hold still for about 15 seconds.

The hardest part is over!

5) Get the Brush Cleaner and sweep it across the scar where the nail tip meets your natural nail.
The Brush Cleaner will smooth out the scar some, so it is not as noticeable.

If the scar is still pretty rough you can file it a little.
Be careful not to file down the white part (the french manicure).

6) Pop off the tabs, and file to your preferred shape/size.

7) Get the Brush On Activator, Shake it and take off the top.
You will notice that it does not have a brush.

Not to worry! There is a reason for it!
You will partner your Activator with the Brush Cleaner for the rest of the process!
So take the Brush Cleaners brush and put it into the Activator.

8) Arrange your "potions" in this order: :)

9) Now you will coat each nail, one by one, first with Brush On Gel
then (with the brush from the Cleaner) quickly switch to Activator and brush it on top of the wet Gel. After using the Activator put the the brush back into the Cleaner. This will prevent the Activator from hardening on the brush.

Make sure that the Gel doesn't dry before you coat the Activator over it.
NOTE: If the nail remains sticky for more that 5 minutes, this will be
the indicator that you didn't do the switcheroo fast enough.
Not a problem! Go over it again, (with Gel then Activator) but this time faster :)
After the nails dry, go over them again at least one more time.
I did the Gel + Activator 3 times.
That really covers the scar and makes them shiny, smooth and sturdy.
That really covers the scar and makes them shiny, smooth and sturdy.
10) Let your dominant hand dry (the nails should dry within 5 minutes)
and then get started on the second hand.
and then get started on the second hand.
After my nails dried I painted them with this polish...


Fast, flawless and easy!
Can you tell these are fake? I still can't!
I am very impressed with this kit! And I still have another set of the plain tips left over when these wear out. :)
Thanks for stopping by!
I hope this was helpful!
<3
LOVE it! I was actually just researching how much a manicure would cost me. But I'd rather do this! :)
ReplyDeletePerfect!! :) you are going to love it!
DeleteOMG!!!!! I love the salon look if not better and with not the pricy cost!!! You explained it down to a "T" awesome:) ....I actually purchased these a few weeks ago and screwed them up sooo bad I was about to chunk the whole box but just shoved it in my drawer pulled it out today and decided to.Google instructions which I should have done to begin with! Lol:/ BUT not im si glad I gave them a second try they are soooo awesome!!!:)
DeleteCan someone help me out here, i used the tips and they turned out great but whats the deal with the "plain manicure'' set it comes with? They're too small for all my fingers and SO squared. am i missing something?
DeleteThose are tips as well. Apply them just the same.
Deletereally good informative post lovely blog...newest follower:)x
ReplyDeletecheck out my blog -
pretty-quirky.blogspot.com
how long did they last?
ReplyDeleteHow do you apply the clear nails,I notice they are not tips like the white ones. I prefer the clear ones better,so how do I apply them
ReplyDeleteThose are tips as well.
DeleteAply them just the same.
Thank you think was very helpful as because my box didn't come with directions....they came out great!!!!
ReplyDeleteJust used these following your tutorial! so good!! thanks
ReplyDeleteI put glitter nail polish over my French tip nails. How do you remove the nail polish when it is time to fill in the nails if nail polish remover will take off the whole nail??
ReplyDeleteYou will need to use the acetone free nail polish remover. :)
DeleteThis is exactly what I was looking for! Thank you so much. My daughter got this set and lost the instructions.
ReplyDeleteThank you so much for posting this!!! I accidentally threw away the instructions that came with it and had no idea what I was doing. Your post saved the day It was so easy after reading your step by step. Thanks so much!!!
ReplyDeleteCan you apply the activator on toenails?
ReplyDeleteI think it'd be okay. They make acrylics for toes so why not
DeleteThis comment has been removed by the author.
ReplyDeleteAmazing post. I like very much and very interesting post. Thank you for your wonderful post.
ReplyDeleteshipping envelopes
Arbitrary Lines-This look might be the most straightforward to accomplish as a result of its unique nature. To do, have any significant bearing one layer of hued nail clean to your nails. My recommendation is red.best nail salon in Manhattan
ReplyDelete