Showing posts with label Holiday Treats. Show all posts

10.23.2012

My Fall Spin On A Graham Cracker No-Bake-Cake


Hey guys!
Here's a fun cake you can get the whole family involved in making because it's kind of like putting together a jigsaw puzzle!
*You'll see what I mean as I continue.

Let's just get to it then!


What You Will Need:

2 Boxes of Graham Crackers
1/2 of the Fat Free Whipped Topping - 8oz container
1/2 of the Nestle La Lechera -13 oz can
1/2 Stick of Unsalted Butter (Softened)
2 tbsp Milk of Choice
2 tbsp Pumpkin Pie Spice

*You can make this cake right on a cake stand or a serving tray.

First you will mix your cake filling.
In a large mixing bowl combine 1/2 of the 8oz container of the Fat Free Whipped Topping, 1/2 of the 13oz can of Nestle La Lechera, 1/2 of softened stick of butter, 2 tablespoons of milk and 2 tablespoons of Pumpkin Pie Spice. Use a mixer to mix all of the ingredients together.


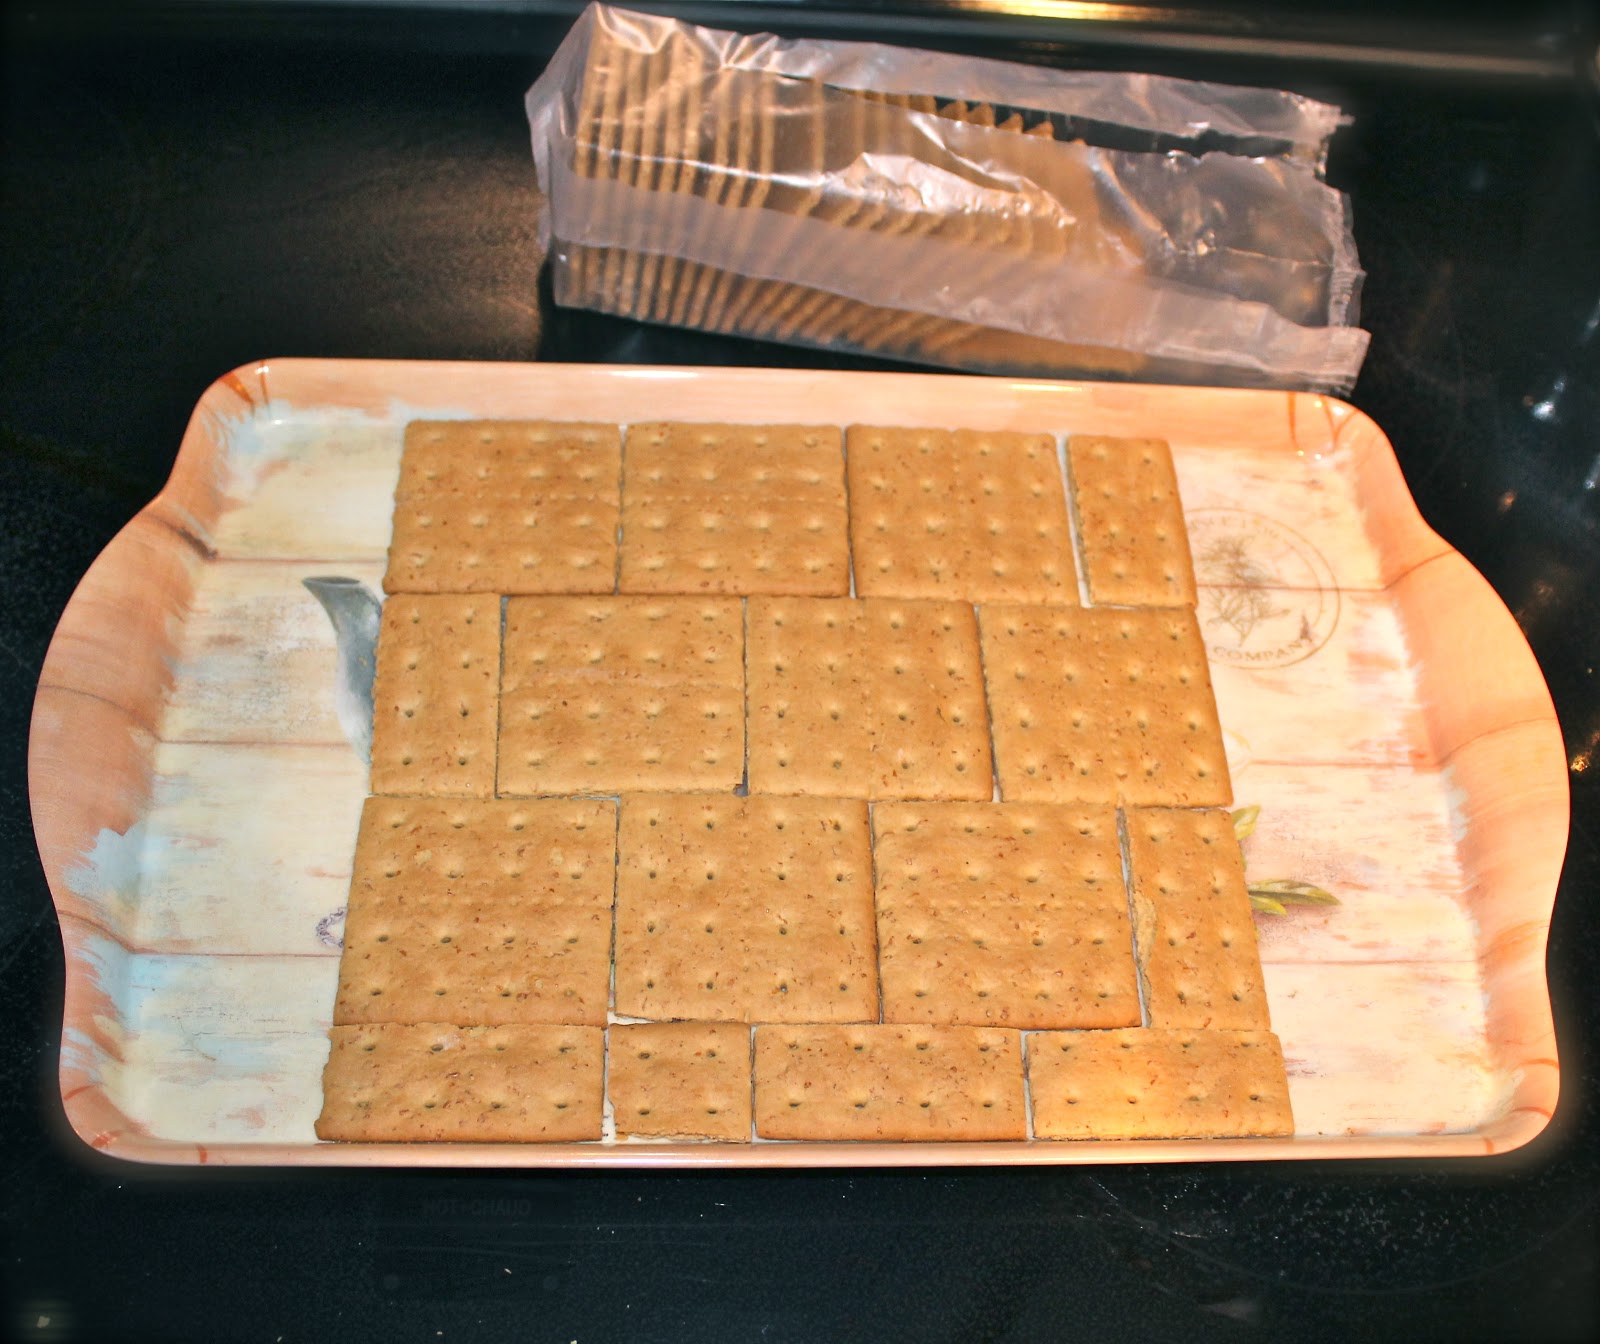
Work on the first layer of the cake. 
You will lay out your crackers on a tray or cake stand in the best fitting square or rectangle possible.

I had to adjust some of the crackers by cutting them in half or even in 4ths, to be able to tuck them in and form a perfect square.
*This is where you can get your family involved in figuring out how to arrange the first layer of your fun little jigsaw puzzle. :)


Now that your first layer is laid out, you will carefully spread on the cake filling.
*This will be the most difficult part of putting this cake together because the crackers will move around on the tray if they are not held in place while spreading the filling on.


Now you will arrange your second cake layer. 
This time you will need to arrange all the crackers differently then you did the first layer. 
*You don't want to end up making a bunch of individual little cakes, so come up with a new arrangement for the 2nd layer.


Next, spread on the filling again and then pile on the crackers again.
This layer can be exactly like the first layer and the next layer can be exactly like layer #2.
You are just going to alternate between layer 1 and 2 all the way till you are happy with the height of your cake.
*Keep in mind, this recipe is for a 6 layer cake and it took me 1 box and a half of the Graham Crackers to reach that height.
Also, you will need to put aside at least 5 to 7 crackers for the crushed topping that I will talk about next.


When you reach your desired height you will spread the cake filling on the top layer and on all of the sides as well.


Crushed topping for the cake.
Grab 5 to 7 crackers and crush them on a cutting board with a roller or put the crackers into a ziplock bag and roll a mug over the bag.


You will sprinkle the crushed crackers all over the cake (top and all sides) and then tap the crushed topping into the filling and you are finished!


The bad news: You won't be able to cut your self a piece just yet.
The cake will need to stand for at least 2 hours so that the filling absorbs into the graham cracker layers. Womp womp! :^(

But all good things are worth waiting for!!!


I hope you enjoy making the cake and eating it too!! :)


11.29.2011

Russian Croissant Cookies with Pumpkin Preserves.

Seems I have fallen into a whole lot of recipe posts lately. Well i can't help it! These winter months are a whirlwind of cooking and baking for me and i love it! :)
I had planned to cook a whole feast for Thanksgiving as we were having my hubbys whole family come over, but that plan got derailed by a better plan of going out of town to a cabin where our relatives were staying for the holiday. (Pictures to come!)
All of the cooking was done by the amazing hostess but i did get to bring a desert!

These are called "Ragaliki". They are Russian Croissant Cookies made with my homemade Pumpkin Preserves. (<~ click for recipe)

This is my moms recipe! :)
It's pretty simple to make so I will share it with you.


You will need:

* 1 3/4 cup of Flour
* 1/2 cup Sour Cream
* 1 Stick of Butter, softened but not melted
* pinch of Salt
* pinch of Baking soda
* any Preserves
(makes 36 cookies)


You will mix your flour, baking soda, and salt in a bowl. Then cut butter into cubes and mix it into the four. Mix with a fork until the flour forms a crumbly texture.


Now, stir in sour cream. The dough will be hard to mix and you will kneed the dough. I taped a sheet of Parchment Paper on my counter where i will kneed my dough. This way the area where you kneed is dry and most importantly clean! So toss a little flower on top of the parchment paper and put your dough on it and kneed it till it is smooth.

Next, you will tear your dough into 4 equal parts and roll each one into a ball. You will take one of the dough balls and roll it out till it is flat.


The dough should be rolled out thinner that a thin crust pizza. Don't worry too much about having it roll out into a perfect circle.

Get your Preserves.
You can use any preserves, jams or jellies for this recipe. What you will do is spread the preserves all over the dough like you would spread the sauce on a pizza. But you will want to make more of the preserves gather all around the edges of the dough. The edge of the dough will be the center of your cookie and we want more preserves in the center!

Prep your cookie sheet and if you have a pizza cutter grab it! Otherwise get a knife and cut the dough into slices. Now you will roll each slice (separately) toward the tip. (Roll from the thick part of the slice toward the tip of the slice.)
When you rolled one, you will move it to the cookie sheet and start on the next slice. When you are done with this batch you will get the next dough ball and repeat the whole thing.


Preheat your oven to 350 and bake for 20 to 25 minutes or until golden brown.
When the cookies are done you may want to sprinkle them with powdered sugar. I sprinkled mine with cinnamon as well.


Now you are ready to impress your guests!!
Let me know how yours turned out!

11.22.2011

Pumpkin Preserves!


Boy, I have been real busy this month! This busy was a good kind of busy so I will allow myself not to feel to guilty about abandoning my Dear Demure for a little bit. :)


Oh! You'd like to know what I've been doing??
Well, I've been "working in my shop", making beautiful things, like i'm one of Santa's elves!!
Here's a sneak peek of what it is I was up to!
These accessories will be making their way to Etsy.com as soon as possible actually!
And yes! I will definitely keep you posted!
That's later, but here is what I did today!


This is my homemade Pumpkin Preserves.
I made this ahead of time because for Thanksgiving I will be baking some treats with it! :)
This is a really simple and easy recipe.


Pumpkin Preserves Recipe:
2 cups Pumpkin pureed (cooked), unsweetened
1 mango pureed (cooked), unsweetened
1 1/2 cup of Sugar
 
Tsp Ground cinnamon
1/2 Tsp ground cloves
2 Tsp Vanilla extract 
Zest of 1 Lemon or of 1 orange
1/2 a lemon squeezed

So let's get started!
Pumpkin Puree:
You will only need half of a small "Pumpkin-Pie Pumpkin" for this recipe.
(Half of pumpkin will make 2 cups pureed) 
Remove the seeds and cut your half into 4 more slices. This will make peeling the skin easier.
There's my peeled and vulnerable looking pumpkin half all ready to be cut up. -->

Cut the pumpkin into half an inch size cubes or smaller, throw them into a small pot and cover with 2 cups of water. Bring to a boil then lower the heat to Medium Low, cover with a lid and simmer until tender. 

While that's simmering do the same with your Mango. Peel it, cut into half inch squares or smaller, and throw them in a separate small pot. Add 1 cup of water and simmer until tender. (You will drain and mash both pumpkin and mango when those are done.) 

Lemon Zest:
While those are cooking get your Lemon and a small grater. You will  grate the yellow part of the peel completely off of the entire lemon. 
This is your "Lemon Zest". 
Now cut the lemon in half and juice one of the halves for this recipe and set the lemon juice aside for now. 
Don't toss the other half of the lemon! Make your self some lemonade like i did! 
Sipping on it now!! mmm! :)


Mix in all ingredients:
When your pumpkin and mango are done and mashed you will take your pureed mango and pour it into the pot with the pureed pumpkin (the bigger pot). You will also stir in the rest of the ingredients into the same pot and put it back on the stove. You will again simmer all on Medium Low, covered for 35 min.


It's ready!!
By now your whole house smells so good and i know you can't wait to taste it!! Go ahead! I tasted mine about 10 times!! :D 


Jar 'em!
And when I say jar them I don't mean the real kind of jarring that your grandma might be really good at. I personally have never jarred yet. So there's still a lot to learn in the future! :)  This is just a real simple way to store your preserves in a nice container inside your fridge. 
What can i say, sometimes I like simplicity! 


If you are like me than you have saved a few jars from store bought jams for these kind of things. Just clean those out real good before you reuse.  
But if you don't have a jar you can just store it in a Tupperware container. No big deal! It's all about the taste anyway!


Well, there ya have it! Enjoy! 
And in the words of Julia Child "Bon appeteeeeeete!" 


Here are a few things I am thankful for this year:
 ~ I am so thankful to be able to stay home and do what I love!! 
 ~ I am thankful for my sweetie, hubby and the never ending supply of kisses he has for me and that every kiss is just as brand new! :)
 ~ I am so thankful to my God that He believes in me.
 ~ I am thankful for my sweet and caring mamochka (mom) and my brothers - my pillars. 
 ~ And I am so thankful and inspired because prayers get answered, because healing still  
    happens, and that God is GREAT and is on our side!


Happy Thanksgiving everyone!!! 

:)


10.06.2011

Holiday Cookies On a Stick

It's October already and I'm sooo excited about it! :)
Holidays are pretty much here!
But personally for me, holidays started as soon as September came around.

I've been basking in the "spirit" by burning my Holiday candles for a month now. :)
This one is a cozy, 3 layer "Our Own Candle Company" candle.
I'm burning through the 2nd, layer as we speak and the whole house is filled with this jolly goodness.

Speaking of goodness!
I am most excited about all the food i will be making for the next 3 months! I have already "broke in" the season with some fun and tasty treats!


These little guys are Cookies On a Stick! They are so fun to make by yourself but they are even more fun to make with someone you love and cherish! Makes for a fun holiday activity! Right about this time every year i regret not having 4 kids of my own by now. It's when the holidays pass that i forget about how fun it would be to start a family. Well a new year is coming! ;)
Back to our Cookie on a stick. They are great for giving and gifting! They also make for a festive center piece on a table!! And nothing beats just eating them off of a stick! Fun! :D


Here's How I made these:

First of all I love it when things are easy and simple!
Though occasionally i do thrive on challenging myself, this time I wanted to keep it very simple. There are harder and fancier ways to make these cookies but not everyone would be able to make them. I wanted you to be inspired to make these on your own too.

Here's what you will need:
1. A sugar cookie recipe
2. Cinnamon powder or even something more fancy like Pumpkin Pie Spice.
3. Small cookie cutters.
4. Paper, pencil, scissors.
5. 12 inch Bamboo Skewers that you can pick up at any grocery store.
6. Cookie sheet and of course an oven.


I used this real simple recipe:

1 cup (or 2 sticks) of butter, softened
1/2 cup sugar
1 large egg
1 tablespoon Vanilla Extract
3 cups All-Purpose Flour 
1/2 teaspoon Baking Power
1/2 teaspoon salt


Instructions:
Preheat your oven to 350.
In large bowl, with mixer on low speed, beat the butter and sugar until blended then increase speed to high and beat it until it is light and creamy. Now, on low speed, beat in egg and vanilla into the butter and sugar mixture and put aside.

In a separate bowl, using a spoon, mix your flour, baking powder and salt together. (You are doing this so that the salt and baking powder are evenly distributed in the flour.) Now, take your large bowl with the butter mixture and mix in the flour mixture portion by portion until all of the flour is mixed in.
The dough should be stiff and crumbly as in the last image on the right. Do not refrigerate the dough as you usually would for sugar cookies. These don't need refrigeration.

Now, get your cookie sheet and  spray it with non stick. Pinch off a piece of dough (about a meat ball size) and roll into a balls. Get your bamboo skewer stick and insert it (a little more than halfway) into the cookie dough ball and flatten the ball after the stick is in. Place your next ball of dough on a cookie sheet but keep in mind that the sticks will have to cross each other so arrange your dough balls depending on how your stick will fit on to the sheet. Don't crowd the cookie sheet it is better to have fewer cookies on it as long as there is plenty of space for the sticks.

Next, you will want to decorate the cookies before putting 'em into the oven. I wanted to stencil the designs on to the cookies and wanted to use what i had in the cupboards and in the house. I didn't have stencils but i had small cookie cutters so i traced them and made my own stencils on paper. I used Pumpkin Pie Spice and sugar mix as the topping decoration.  You will mix equal parts of Pumpkin Pie Spice and sugar together into a small bowl. You can also use just Cinnamon powder and sugar. To sprinkle the spice and sugar on you can use a spoon or a small strainer.
Place your stencil design in the center of the flattened cookie dough and carefully sift the spice and sugar mix on top. Gently pat the mixture into the cookie.
Then remove your stencil very carefully and move on to the next cookie.

This is what your cookie should look like before you toss it in the oven. :)


You will bake at 350F for about 10-12 minutes. If your oven is like mine than you will want to check the cookies 8 minutes into it. Better safe than scorched!

The cookies are done when they get golden brown on the edges. When you remove the sheet from the oven let the cookies cool down for about 5 minutes before you take them off the sheet. Do not pull by the stick. Remove by gently twisting the cookie off of the sheet.


I planned to give some of the cookies away because i made a bunch so i wrapped a few of them for gifting. But my hubby has a sweet tooth and the cookies were so good and well...we ended up eating all of them in a few days. haha!


If you are better at giving than me and would want to give some of your cookies away, you can wrap them with saran wrap and tie with a ribbon.


Here's a simple way to do that:
I tore off a square of saran wrap and cut a small hole in the center of it. Then pulled the stick through the wrap, bunched the wrap at the top of the cookie and tied it with a ribbon and there ya have it!


I hope I have inspired you to start this season off with some cookies on a stick! :) 
If it is easier for you to find popsicle/ice-cream sticks at your local grocery store than you can use those too. I just used what was available at my grocery store.

I already have another holiday goodie in mind for my next blog, so come back soon!!


~the end~


Related Posts Plugin for WordPress, Blogger...