Showing posts with label Trash to Treasure. Show all posts

6.25.2012

DIY Scalloped Jean Shorts


Hello dear visitors!

Every time summer comes around, before I ever go out shopping for summer clothes, I always go through my closet first to find what I can convert into summer clothes. Usually the items that would get a makeover would be items that spend a year (or more) in the darkness of the furthest corner of the closet. Sad. Well, I'm thrifty and I don't like to waste clothes that I was once excited about.

Today I wanted to share one of this makeovers with you!
This is a fun and easy DIY that I know you will just love and will do it yourself!

This project can be done with any old pair of shorts or pants.


These used to be pants that I have converted into shorts that i'll be converting to scalloped shorts. :)

Here's what you will need:
Old Pants / Shorts
Scissors
Pen
Ruller
Paper towel
E6000 Glue (or a sewing machine if you have one)


First, The piece of paper towel is going to be your pattern. Fold the paper towel twice. The distance between the folds will be the size of your scallop. (About an inch)

Next, using a ruler trace the two fold lines.

In between the two folds you can either draw your scallops free hand or use a round object and trace it.

Now your pattern is ready and you can cut it out.

You will turn your shorts / pants inside out and place your pattern on to the pant leg and trace the scallops on to the pant.

If you plan to cut through both layers, flatten out the pant and smooth out any wrinkles with your hand before you cut.
But if you would rather be more careful with your cutting I suggest turning the pant over and tracing the back side of the pant leg with the pattern as well and then cutting (one layer) front to the back.

Next, since we all know that if you wash that pair of jeans shorts your beautiful scallops will become a mess of frayed threads. To avoid that, if you have a sewing machine, you can stitch the edge like I have

and you are ready to show of your handy work to your girl friends :)


If you don't have a sewing machine you can use a glue. The glue that I believe is best for this project is E6000. It is flexible when it dries and is waterproof.

I used a Q-tip to spread the goop neatly on to the edges.
And that's it!


6.01.2012

DIY Dessert & Cake Stands

Hello love bugs!
It's Summer! And it's wedding season!!
You've probably already attended at least one wedding so far and like me, got to see some of the most festive and creative wedding decor, tasted some of the yummiest treats and probably got very inspired to be real creative for your own party/get-together that you will surely find a reason to throw this summer!
Well, if that's the case then you will probably enjoy eyeballing this blog! <( o ) >  < ( o ) >


The above picture is from Sweet and Saucy Supply, they have such gorgeous party supplies. They also have all kinds of amazing treats in their Sweet and Saucy Shop to fill your guests! Check them out!

If like me, you are on a budget for your party, (and who isn't??) then I have a DIY project for you!
We will make beautiful, romantic Dessert Stands out of some used plates and candle holders!
This DIY project will save you a whole lot of dollars and will bring you bundles of satisfaction and a reason to brag to your friends about your super crafty self! :D


Things you need to assemble these:

Glass or Ceramic Plates
Glass or Ceramic Candle Holders
Sand Paper
Epoxy Adhesive
Masking Tape
(click to see pictures of products)
Note: You will also need some tooth-picks (or we used q-tips) to mix the Epoxy Glue with
and a plastic cup or plate to mix the mixture in. You should use items you are willing to throw away afterwards.


The random plates and candle holders were purchased at a thrift store. The rest of the supplies you can pick up at any craft or hardware store.


Start by cleaning your plates and candle holders and make sure to dry them thoroughly.

1.) You will sand the bottom of the plate, just the bottom center of the plate that you will be attaching your candle holder to. This will create a porous surface that will help the glue attach better.


2.) You will also sand the top rim of the candle holder.
The candle holder in the picture had a color coating on it that needed to be thoroughly sanded off at the rim.
The first time we didn't do a good job of sanding this one and it popped right off. So if the plate or candle holder have some kind of a color coating on them, sand it real good.


3.) Next you will adhere the two pieces together.

The best glue option for this project is the Quick Setting Super Glue Epoxy Adhesive. The great thing about this glue is that it is clear, strong and sets in 5 minutes but the bad thing about it is it comes as a double barrel syringe which could be a little difficult to push at times and you really need the exact equal amounts of both substances to come out and then you need to mix the two substances together thoroughly so they end up adhering and drying properly. So that could require preciseness and concentration.

You will use about a coin dollar size amount of glue per dessert stand. Remember it sets in 5 minutes after mixing, so work fast.

Make sure your plate is laying upside down and is sanded and ready for the candle holder.

After mixing the two epoxy substances together, quickly pile on the mixture all around the candle holder rim and adhere it to the plate while the plate is laying flat against an even surface. Then, use your left over mixture and apply it around the seem between candle holder and plate for extra durability.

4.)Next tape the candle holder to the plate with masking tape and set aside to dry with dessert tray remaining upside down on an even surface.

Just to be extra careful we let the dessert trays dry over night, though the ones I checked 5 minutes later were totally set and ready for use!


My DIY Dessert Stands were pretty basic and simple but you can get way more creative by selecting colorful plates or unique candle holders. You can use vases, cups, or glasses instead of candle holders. You can use bowls instead of plates and make your dessert stands tiered!

Here are some of my favorite DIY Dessert Stand ideas from other blogs.


This one can be purchased from Trudy10

And my favorite one is from A Beach Cottage


3.19.2012

**GIVEAWAY** + an accessory DIY.

Hello my Dear Demures!
The other day I had a GREAT IDEA!


A GIVEAWAY idea!

To show my gratitude and appreciation to my followers I want to give something away from my ~>Etsy Shop<~. But I want you TO WANT the item, so that's why I thought I should let you guys give me your suggestions on what item I should give away!

So, browse my ~>Etsy Store<~, pick an item and leave me a comment with your suggestion here, or on my DearDemure Facebook, or anywhere else you are following me. Then I will see what item was most desired and on Monday of next week I will get the drawing going.

I mean... who doesn't like a GIVEAWAY? Especially if you get to pick the item! :)


In other news.... 


I had myself a little DIY project earlier today.

I had this shirt for a little over 2 years. Got it at Walmart one night while shopping for groceries. It was pretty, on sale - $5, and I saw potential in it...


But, no matter how I tried to accessorize it, tuck it in, wear it under, or wear it over, it just never looked quite right.

Well, today I had enough of its shenanigans and put scissors to it, and chopped that collar right off.

I cut it right under the seem making sure to include a button on it. That way I would be able to button it right up and not have to mess with any more sewing or fixing.

And here it is!
My cut-off collar!


I tied a lace ribbon around the fold of the collar and folded the collar over it, threw on some pearly beads and BAM! A new accessory!

A shirt that could have been a complete waste of money has redeemed itself!


<3

~inna~

10.20.2011

Re-Wick a Candle


It's getting a little too cold for me here in Tennessee and it's only October! Fall is my most favorite season of all! Though it is odd that i really hate the season that follows: Winter. And for so many reasons too! Most of them do have something to do with me being miserably cold though.
I'm sure whoever it was that made up the holidays... must have felt the same way about it and decided that all the best and fun holidays should be in the most miserable time of the year. Yes that's it! That way life is fair! haha!
I have mentioned in my previous entry that i have been doing a lot of candle burning lately. Especially now that it has gotten colder. The flame, though little, keeps me warm and cozy. :)  Sadly some of my favorite candles have let me down by burning out way before their time, way before the wax got a chance to serve it's purpose!
Gosh, i would just hate to have to toss them when the best part about the candle is only half way used but the wick is completely burned to a knob. So one day, actually way back in the day, in my high-school years, i figured out a way to revive a burned out candle and ever since then I have saved many a candle with a simple and easy method that i will show you down below.

It's weird, but i find great pleasure in saving/reviving/restoring or recycling things. Have been doing that ev'r since i got my first tooth! (well kinda)
Though, don't get me wrong, i'm like any other girl, i LOVE shopping for new things too, but nothing beats the joy of saving something that someone else would have given up on. :)

Here's How:

First thing you will do is figure out if the wax of your burned out candle can be pulled out of it's original jar. You will want to break the wax into smaller pieces, pull out the remaining wick or the metallic wick holder and place the pieces of wax in a microwavable bowl.

NOTE: You do not want to microwave in the original jar because you don't know if it is microwave-safe and plus the metallic wick holder will spark in there.


The best way is to pull out the wax, crumble and use the microwave. 

A few of my candles were impossible to pull out of their jars so i had to melt them on the stove. I do not recommend this process because one of my candle jars did end up cracking on the bottom because of the heat (even though it was on the lowest setting on the stove). :(

NOTE: you will actually use the "Defrost" button on your microwave instead of just heating it on the normal setting. The Defrost button will heat the candle slowly instead of shocking it and having it bubble and splatter inside.
So Defrost! :)
I had mine set for 15 minutes and that did it!

While that was melting away in the microwave i prepared my new wick. The best and easiest way is to cut a long strip of a cotton piece of fabric for the wick.
Note: The thicker the fabric the better.
If your fabric is really thin, you can braid it.


I had this pretty piece of cloth that I used cause I like to burn fancy things!! No, Actually, i have a closet full of all kinds of crafty goodies and so I used what i was able to find in there. If you don't have a magical closet, full of crafty goodies, you can use an old pair of jeans! Just cut yourself a strip and you're good to go!

Make your strip about 1/3 of an inch wide or a little wider. For the length, you will measure your original candle jar and double the height of it. That will be your length.

Next tie a knot at one end.
See if you can tie it at least 3 times on top of the same knot. The heavier your knot is the better. Hopefully by the time you are done measuring, cutting and tying, your wax will be totally melted and ready to pour back into your original jar.


NOTE: Use oven mitts to handle your bowl of wax. It will be hot!! Also you might want to cover your table or your work area with a paper bag or newspaper.
Carefully transfer the melted wax into the original jar and quickly wipe the bowl with a paper towel cause you don't want hardened wax on the walls of the bowl you were not planning to throw away yet.


Then, get your new wick and grab a pencil or a pen and place it by you.
Next, dip your wick (knot first) all the way into the wax leaving only the tip you are holding it by.
Let the wick soak up the wax for a little bit.


Pick up your pencil/pen or in my case a bamboo stick left over from "cookie on a stick" and wrap the wick around it like a spiral. Keep wrapping till the knot on the end of the wick is touching the bottom of the jar while the rest of the wick is hanging straight down from the stick.


Adjust and move your stick to have the knot in the very center and bottom of the jar. You can see my knot resting on the bottom of the jar. :)
(click on any picture to enlarge)
If your jar is not see through, like mine, you might want to get another stick and guide the knot into the center, bottom of the jar then slowly and carefully pull the stick out making sure not to nudge the wick.

Now you will transfer your candle into the fridge. Be very careful not to move or touch the stick. You don't want to move the wick out of the center of the jar.

Leave the medium size candle it in the refrigerator for an hour or so. If you have a large candle you might want to leave it in for 2 hours or so. It's safer to give it more time to harden versus less.
I had a little incident the other day with one where it collapsed into itself and the wick fell all the way to the bottom of the jar and hardened that way. I had to melt the whole thing and start from scratch again. Have to say...not as fun the second time around for some reason. So yes, the longer the better.


After refrigerating, pull your stick out of the coiled wick. Now you will trim it to be about 1/3 of an inch or even shorter. This will adjust the size of your flame. I like to have a smaller flame, that way the candle last a little longer, so my wick is about 1/4 of an inch.

Well that's it! You're done!
Now light it and be proud of yourself!! :D

Let me know if this was a helpful tutorial and if it worked out for you!
I'd love to hear from you guys!

9.09.2011

From Trash to Treasure

Thanks for stopping by!! :)

It's been way longer than i anticipated!
Due to some "issues" with this current project, i was not able to blog as often as i planned.
This little, demanding, renovation left me questioning why i would ever do this again. hah!
Never have i yet had as hard of a time with something as this time.
I admit, there was even a time i was considering bashing the thing with a mallet and setting it on fire in the backyard while documenting the event for the blog.
But i had already put so much time, nails and glue into it, giving up was not an option.

When i first brought it home from the thrift store it looked good
but was wobbly and falling apart at the seams. 
It was also completely covered with dead spiders 
and spider cocoons all on the inside. 
It took me a few rounds around the thrift store before i decided to "man up" 
and take the thing home.
When i brought it home, i left it in the driveway
and sprayed it head to toe with clorox bleach to kill any possibility of a live spider.
Mind you, these were brown recluses!!!
  After drenching the dresser in clorox i hosed it with high, pressured water
and quickly wiped it with a towel to avoid damaging the wood
and left it outside to air out and dry out.
I only did that because of the urgency of killing off the poisonous spider.
(i don't recommend doing any of the above as this will damage any plywood)

A few days later i was able to start on getting the thing into tip-top shape.
There was a lot of gluing, hammering and even bleeding!

Next, sanding and peeling of the damaged plywood.
The job was hard and messy. 
My arms were sore, my thumbs blistered and the dust was everywhere on me and in the yard.
It might be smarter to invest in an electrical sander one day,
though something about doing it all by hand seems more legit to me. 
I cherish my work more when i have to work harder than i have to on it. hah!

There was some very strange, as i called it "unidentified damage" inside one of the drawers 
that had to be patched up with some wood filler.
Can we talk about wood filler for a second? 
What a great invention!! It's a must-have around the house! 
You can even use it as clay and make things out of it. 
Ooooh a new idea for a blog!! :)

Elmer’s Wood Filler is what i used. It's consistency is like clay. 
It is quick drying, weather resistant, sandable and stainable. 
I let mine dry for 24 hours though 
mostly because i moved on to working on the drawer knobs.

I know it's trendy right now to put fancy knobs on old dressers 
(which i have done before) but i like to preserve what i can, 
especially if the original knobs are so lovely.
I started by sanding each one trying to get into the crevasses.

 Next i spray-painted them brown and after they dried i spray-painted them again 
but only the tops this time with a copper color.
After that i sanded the top for more of an antique/weathered look.  

With all the privileges of living in a modern, fast-paced world that i appreciate, 
you would think that spray-paint was an invention that a girl like me would LOVE right? 
WRONG!
When i put the can up to the dresser and started to spray-paint the bigger surfaces 
i was in on an adventure i don't want ever again.
Conclusion: Do not use spray paint on large surfaces 
unless you want to have to deal with a spotty surface 
which i thought would be fixed/hidden by a coat of polyurethane. 
Wrong again Inna!
Apparently, if you apply polyurethane on top of spray-paint 
(yes even after it has dried for a day) the paint will bubble and peal.
This is the time when i actually cried a little cause i knew 
i would have to strip the paint and start from scratch.

Stripping paint is hard and not fun! 
You will need to have this kind of a tool and gloves to remove the melted/bubbled paint 
and if you don't wear gloves that stuff will burn your fingers! 

When you're done scraping that paint 
you will need to sand the surface before you can move on. 
Get the Strip-X® Stripper if you will ever find yourself as lucky.

After hours of scraping and sanding 
i took a chip of the old paint with me to Ace Hardware. 
There they (supposedly) matched the color for me 
by custom mixing some paint into a can.

Here's me annoyed after all that work to find out that the paint color is a little off.
Oh well, i didn't want to put any more money into getting this thing restored. 
I already spent way more than i expected on this prima-donna of a dresser,
so i gave it a nice coat of paint and left it to dry for another day.

Next, back to sanding! 
This time though to give the dresser a little personality 
and also to sand down the wood filler on one of the drawers. 

Two more things left to do and it's finished!

Put a coat of lacquer (or polyurethane) all over the dresser.

As you see this time i also got a brush-on lacquer versus a spray-on. 
Just smother the whole thing in that satin goodness and let dry. 
This one dries pretty fast too! 
Brushed it on in the morning and by evening time it was totally functional. 
No smell and no mess-ups!

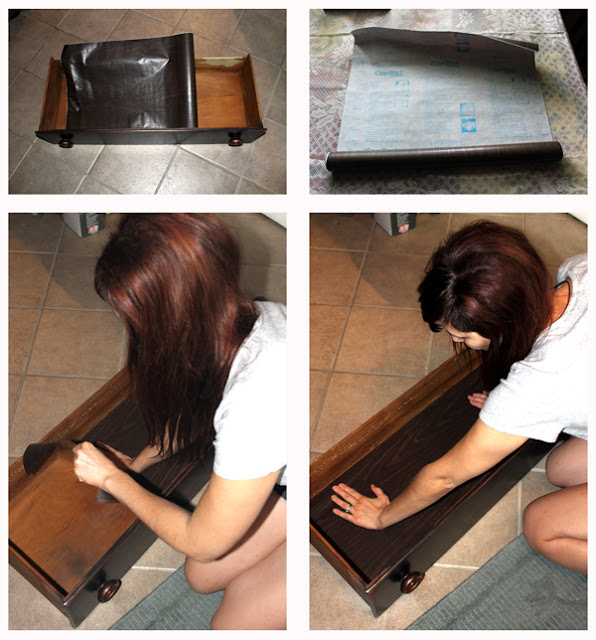
And while the dresser was drying this is what i did to the inside of the drawers. 
They were really stained by the previous owners 
and even though i bleached the whole thing in the very beginning 
and also sanded the drawers on the inside, 
i was still not able to remove some of the more bizarre stains. 
So, these drawer liners fixed that issue and i was all done! 

Here it is with the Before and After shots!


Now i can finally move on to something new. :)
Thanks for coming to see the transformation!


~inna~


Related Posts Plugin for WordPress, Blogger...